Sunday, April 29, 2012

Smoky Caramelized Maple Kale with Candied Pumpkin Seeds

 I think I've mentioned a few times on here that Abiline loves kale; to clarify, what she really loves is caramelized kale. Here is a new twist on her favorite, which I made last night. And today for lunch. In fact, we went to the Farmers' Market this morning just to buy more kale so that we could eat this again this afternoon. This has become my quick and easy go-to side when it seems that a meal needs more green.

For the caramelized kale:
1 large bunch of kale, leaves removed from stems and torn into bite-sized pieces (or keep some stems in if you like them; we eat them as well sometimes.)
dash of sea salt
1 Tbsp. olive oil or coconut oil
1 Tbsp. balsamic vinegar
1 Tbsp. maple syrup
1 tsp. liquid smoke

For the candied pumpkin seeds:
1/2 Tbsp. soy-free Earth Balance or coconut oil
1/3 c. raw, shelled pumpkin seeds
1/2 Tbsp. maple syrup
1/8 tsp. sea salt
1/8 tsp. cinnamon

1. Heat the oil in a large skillet over medium-high heat. Add the kale, sprinkle with salt, and saute for a minute. Add the maple syrup, vinegar,  and liquid smoke, stir to coat, then cover the pan and cook for about 7 minutes, until the leaves have cooked down and are starting to become crispy and caramelized. Stir the kale so that the un-caramelized leaves on top are on the bottom, cover again, and cook for a few more minutes until everything looks a tad brown, crispy, and caramelized--no soggy bits.
2. While the kale cooks, make the candied pumpkin seeds by melting the Earth Balance and coconut oil in  small pan over medium heat. Add the pumpkin seeds and stir around for a few minutes until they start to smell toasty and look a tad browned. Add the maple syrup, salt, and cinnamon and stir around for a few more minutes; be careful they don't burn. Remove the seeds from the heat and let them cool a bit. Sprinkle them on the cooked kale before serving.

This recipe is linked up to My Meatless Mondays, Slightly Indulgent Tuesdays, Allergy-Free Wednesdays, Whole Foods Wednesdays and Wellness Weekend.


No one would smile for me this weekend!


Friday, April 27, 2012

Creamy-Dreamy, Thick and Rich Homemade Coconut-Oat Milk Yogurt

About a year ago, I had an urgent craving for plain, whole milk yogurt.  I remember making a special trip to Whole Foods right before they closed; the craving was so intense that I just couldn't wait until the next day. I took it home and blissfully devoured it. The next day, I fed one tiny spoonful of that yogurt to Abiline, saw her entire body immediately break out in an angry, red rash, and that was it---that was my last carton of yogurt, ever.  Since then, I have not craved dairy yogurt; I have found that once you stop eating dairy and get it out of your system, your body no longer wants it.

I started making my own non-dairy yogurt last summer since I wasn't happy with the price and very sweet flavor of So Delicious coconut milk yogurt.  I have posted two yogurt recipes on my blog, which the kids and I have really enjoyed, but the texture was never thick like dairy yogurt, never quite what I wanted.  I had been using xantham gum (before I knew it was corn-derived) to thicken the yogurt, as I had not had success with agar or various starches. Then it occurred to me this week, "Why don't I try combining agar powder AND tapioca starch?" So simple.  So awesome. This is the real deal: non-dairy yogurt, as thick and creamy as that whole milk yogurt I once adored.


Equipment needed: medium-large sized pot, candy thermometer, large glass jar with lid and crockpot or a yogurt maker

1 can full-fat coconut milk
2 cups homemade oat milk (instructions below)
2 Tbsp. tapioca starch
1 heaping tsp. agar powder
2 Tbsp. already prepared plain yogurt, either store-bought or from your last batch of homemade
***Update! I just found this non-dairy yogurt starter at Whole Foods, and it worked great!

Notes on ingredients:
-I use homemade oat milk because I want to make this more economical.  I would think that you could use two cups of your favorite non-dairy milk in place of the oat milk, but I am not sure that you would get the exact same results. In my experience, if you want your yogurt to be tart, just be sure that the non-dairy milk you use does not have any added sugars.
-I use tapioca starch because it is more affordable than arrowroot, and my son is allergic to corn, so cornstarch is out. I do not know if another starch would yield the same results as the tapioca starch.  


1. To make the oat milk, soak 1/2 cup steel cut oats (can use gluten-free, of course) in 2 cups of filtered water overnight. In the morning, pour the oats and water into your blender and blend for about a minute. Then strain the milk through a fine mesh sieve, squeezing the oat pulp as you go to get all of the creamy good stuff out.  (I use the oat pulp in pancakes, muffins, etc.)

2. Pour the oat milk back into the blender along with the coconut milk, agar, and tapioca starch. Blend until thoroughly combined.  Place the milk mixture into your pot and clip the candy thermometer to the side of the pot so that it is touching the milk, not the bottom of the pan.  Heat the mixture over high heat until the thermometer reaches 185 degrees. This kills all of the bacteria that you don't want to culture.  Be sure to watch it so that it doesn't boil over.

3. At this point, take the already prepared yogurt that you will use as a starter culture out of the fridge. If you are using your crock-pot, warm it up to 115. Take the pot off the heat and let the mixture cool until it reaches between 120 and 115 degrees. Once the milk is the right temperature, stir in the starter culture yogurt and do one of the following so that the yogurt stays at 120-115 degrees for the full incubation period: 1) place the mixture in a glass jar with the lid just placed on top, not screwed on, and place it in the pre-heated crock-pot with the crock-pot lid on and a towel wrapped around the jar; or 2) pour the mixture into your yogurt maker. (I think it is worthwhile to just spend $30 on the yogurt maker; it reliably maintains the temperature with no fuss.) Allow the yogurt to incubate for 8-10 hours. The longer it sits, the tarter it gets!

4. Once the yogurt is done, place it in the fridge for a few hours to cool down. It will become very thick and almost solid. To get the desired texture, place the cold yogurt in a food processor (preferred) or blender and just blend for a few seconds to smooth it out.  I like the yogurt just plain and tart, but if you want it sweeter, I think the best way is to just add a bit of stevia or maple syrup and a bit of vanilla or to swirl your favorite all-fruit jam into individual servings. If you add a bunch of liquid sweetener or fruit, this will water down the creaminess of the yogurt; it will still be good, but just not as thick.

This recipe is linked to Allergy-Friendly Lunchbox Love, Slightly Indulgent Tuesdays, Allergy-Free Wednesdays ,Whole Foods Wednesdays, Wellness Weekend and Allergy-Friendly Friday.


Monday, April 23, 2012

Nut-Free Raw Brownies with Chocolate Hemp-Seed Butter Filling

Overall, we would certainly call ourselves healthy eaters in the Holden household, (Abiline requested kale for dinner last night), and--in my opinion--chocolate is part of a healthy diet.  Take these raw brownies for example: they are a great way to eat super-nutritious seeds and buckwheat. And with the dates and banana in there, I almost count this as a serving of fruit for Abbie (who reaches for veggies while turning up her nose to almost any fruit not in smoothie form). The raw brownie idea is certainly not new, but they seem to always be made out of nuts, which of course doesn't work in our allergy-friendly kitchen.  Fortunately, the seeds worked well in this recipe; both Sawyer and Abiline devoured these brownies for snack today and protested when I said we were going to give some of them to a friend.  Of course we talked about how it is good to share, but I was secretly pleased that the kids liked the brownies enough to grab for the bag and look worried at the prospect of losing them.


For the brownie layers:
1 1/4 cup raw buckwheat groats
1 cup raw, shelled hemp seeds, pumpkin seeds, and sunflower seeds (I used about 1/3 cup of each, but this is variable depending on what you have on hand.)
3 Tbsp. cocoa or carob powder (I did 2 Tbsp. cocoa and 1 Tbsp carob, as I like the fruity accent the carob gives.)
pinch of sea salt
1 cup dates, soaked for an hour to soften them up, then drained
1-2 Tbsp. agave nectar, as needed to bring the dough together 

For the chocolate hemp-seed butter filling:
1/2 cup raw, shelled hemp seeds
1/2 medium banana
1/4 cup raisins, soaked for an hour to soften them up, then drained
2 Tbsp. cocoa powder, or 1 Tbsp. cocoa powder and 1 Tbsp. carob powder, if you like the carob undertone like I do

1. Grind the buckwheat and seeds to a fine powder in your food processor. Add the cocoa powder and salt and pulse to incorporate. Add the softened dates and 1 Tbsp. agave and buzz until everything is well-combined, and you have a dough that is moist and holds together well when you press it into a ball.  If it is dry, add additional agave until it holds together.
2.  Line a workspace with parchment paper. Remove the dough from the food processor work bowl and divide it into two equal portions on the parchment paper. Use your hands to press each piece of dough into a rectangle about 7x10 inches, a bit smaller than your standard piece of computer paper.
3. Make the filling by buzzing all of the ingredients together in your food processor until smooth. Spread the filling evenly over one of the brownie layers and place the other rectangle on top to make your brownie sandwich. Using a sharp knife, cut into even squares. These are pretty rich; I made about 1 1/2 dozen squares.

 Here is Abiline's "Please give me more brownie!" face. By the looks of it, she had already had enough...

This recipe is posted to Slightly Indulgent Tuesdays ,Allergy-Free Wednesdays , Whole Foods Wednesdays and Wellness Weekend.

Maple-Cinnamon Quinoa Pudding (Un)Birthday Breakfast Cupcakes

Friday was Sawyer's fourth birthday. I wanted to make him something special for his breakfast, but he has pancakes and waffles all the time, so I wondered what I could make that would be a treat for him. Then I remembered the mini ice cream cones in our cupboard, and how once I had made him cupcakes cones that he found pretty thrilling.  Why not make breakfast "cupcake" cones?  Using what I had on hand at 6am this morning, I whipped up a maple-cinnamon quinoa pudding and some sunflower seed butter frosting, added a dash of sprinkles to please the birthday boy, and got both Sawyer and Abiline eating seconds of a protein-rich, refined-sugar free breakfast.  So whether it's your birthday or un-birthday, go ahead and dig in! The quinoa pudding is gluten-free, and you can keep the whole thing gluten-free by just subbing some gluten-free cones (although I don't think those come in miniature size).  Keep in mind that the cones get a bit soggy after a few hours if you don't eat these right away, so I recommend that you make some in mini- or regular-sized muffin cups if you mind a soft cone and anticipate leftovers.  


For the maple-cinnamon quinoa pudding:
1 cup cooked quinoa
1/2 cup pitted dates
1/2 cup (packed) cooked white beans
1 1/2 tsp. ground cinnamon
1/4 tsp. sea salt
1 tsp. maple extract
2 Tbsp. melted coconut oil
2 Tbsp. maple syrup

For the frosting:
1/4 cup sunflower seed butter
1 Tbsp. maple syrup
1/4 cup pitted dates
3/4 tsp. ground cinnamon
3/4 tsp. maple extract

1. Soak the 3/4 cup dates that you need for both the pudding and the frosting in boiling water for 7-10 minutes, until softened. Alternatively, you can cover the dates with water and microwave them for about two minutes until softened.
2. Preheat the oven to 350.  Place 18 mini cupcake cones or 9 regular-sized cones on a baking tray. (Or you could just line the same number of mini or regular-sized muffin cups.) Place all of the pudding ingredients in your food processor work bowl and buzz until smooth. Spoon the pudding into the prepared cones or muffin cups and bake them in the preheated oven.  The mini cones took 12 minutes to bake, and I made one large one that took 20 minutes to bake.  When they are done, a toothpick inserted in the middle will come out clean.
3. Allow the cupcake cones to cool while you whip up the frosting.  Blend all of the frosting ingredients in your food processor until smooth. Slather the cooled cones with the frosting; top with sprinkles, if you are feeling in the birthday spirit.

'
As for Sawyer's birthday cake, he wanted a dinosaur cake. I was pretty proud of this one, the idea for which I found here. But when I brought it out, the cake got almost no reaction from him so I though he didn't like it.  Anthony said Sawyer must have just been overwhelmed with all the birthday festivities at the time because in his prayers that night he gave thanks at length for his cake.  Phew! I was glad to not disappoint after he had talked about the cake for weeks beforehand!


This post is linked to My Meatless Mondays, Made From Scratch Monday, Melt in Your Mouth MondaySlightly Indulgent Tuesdays ,Allergy-Free Wednesdays, Whole Foods Wednesdays,and Wellness Weekend.


Sunday, April 22, 2012

Sprouted Wheat Berry Smiley-Face Crackers

It is not often that Sawyer takes a bite of something and tells me it is "delicious," but he has done that twice with these crackers that I made on the spur of the moment at snack-time last week when I needed to do something with the over-sprouted wheat berries hanging out in my fridge.  I had found that when I made my secret ingredient almost sugar-free cut-out cookies that over-sprouted wheat berries work great in cookies, so why not try crackers? Abiline preferred the dough because the crackers came out really crispy, so next time I think I would roll some of them a bit thicker and leave others really thin for Sawyer who loves ultra-crispy.  It is hard to please both children at once!

The smiley-faces are optional, of course, but they were fun for Abiline.  Every time Sawyer sits down to draw in his sketchbook like his daddy, Abiline wants to color, too, but quickly gets bored, turns to me, and urges "Draw face, Mommy! Draw face!"  I then scrawl a shamefully primitive version of a face while she giggles in delight.  Great artist is not currently on my mommy resume, but luckily my children are generous art critics.


1 1/2 cups sprouted wheat berries (with sprouted tails about twice the length of the berry)
1/4 tsp. salt
2 Tbsp. melted coconut oil
2 Tbsp. brown rice syrup
1/4 cup white whole wheat flour

1.  To sprout your wheat berries, place about 1/2 cup dry wheat berries in a glass jar with a lid, and add enough water to cover them plus fill the jar a few inches above the berries. Place the lid on, but do not screw it on. Soak the berries overnight, then drain them in the morning in a fine mesh sieve and rinse them with you faucet turned all the way up, to really blast those berries with the water. Shake them around to get the excess water off and then put the wheat berries back in the jar with the lid placed on top. Rinse them again at night, about 12 hours later. Continue to rinse them morning and night until they are sprouted and their tails are 2-3xs as long as the wheat berries. Be careful to catch them before they sprout leaves, as then it is too late to use them for baking.
 2. Preheat your oven to 350 and line a cookie sheet with parchment paper. You should start with wheat berries that look like this:


Place all of the ingredients and your food processor and pulse until you have a smooth paste. You want to crush the wheat berries completely because any whole chunks will become hard when you bake them.
3. Transfer the paste to a small mixing bowl and stir in the flour until a soft dough forms. You may need to add an additional tablespoon or two of flour if your berries had sprouted a bit farther than mine, as that may make the dough even moister.
4. Roll out the dough on a floured work surface, 1/8 inch for crispy crackers, almost 1/4 inch for less crispy.  I cut mine out using a really small biscuit cutter and poked the holes for the face with a toothpick, but you can make whatever shapes you want. Place the crackers on the prepared baking sheet; I made about two dozen.
4. Bake the crackers in the preheated oven for 12 minutes, turning the pan 180 degrees half-way through the baking time.  Check them at this point,and if they aren't looking browned on the bottom, bake them for a few more minutes, checking frequently so they don't burn.

This recipe is featured on Allergy-Friendly Lunchbox Love ,Melt in Your Mouth Monday , Whole Foods Wednesdays, and Kids in the Kitchen.


These made great snacks at the beach this weekend!


Tuesday, April 17, 2012

Great Green Granola Energy Bars

Abiline loves granola, which is wonderful because my wee little lassie needs dense foods like that; you can pack a lot of nutrition into granola. At Whole Foods they sell a green granola in the bulk section that goes for $11 a pound. Abbie loves green foods, so I have been tempted to try it, but there is really no justifying spending that kind of money on cereal.  So, here is my try at making my own green granola, complete with avocado, spirulina, limes, kiwi, pumpkin seeds, and hemp seeds. What did I leave out that's green? Spinach?  That just seemed like it would make everything soggy.  But, if you dare, go ahead and throw that in, too!  First I made the granola, which tasted great with some coconut milk on it, but was a bit too avocado-y for me when eaten out of hand.  Really, it tasted great before I baked it, so if you want to enjoy it raw, please dig in. I decided to turn the baked granola into bars that I could take on the go, and those I found to be quite more-ish right from the pan. I just love when healthy food is yummy; it makes me feel that God really loves us and made a way for us to be both happy and healthy too.


For the granola:
3 cups rolled oats
1/3 cup flaked coconut
1/2 cup raw, shelled pumpkin seeds (or half pumpkin and half hemp seeds)
1/2 cup crushed banana chips (optional)
3 Tbsp. vegan protein powder (optional) 
1 medium, very ripe avocado
3 Tbsp. coconut oil
1/4 cup brown rice syrup or agave nectar
3 Tbsp. dry sweetener, such as coconut sugar or sucanat

1 tsp. spirulina (Next time I think I would use 2 tsp. to enhance the greenish hue.)
pinch of sea salt
juice and zest of 2 limes

For the granola bars
2 1/2 cups of the prepared granola
1/2 cup of raw, shelled hemp seeds
2 very ripe kiwis, peeled
juice and zest of 2 limes
1 Tbsp. agave nectar

1. To make the granola, preheat the oven to 350. In a large mixing bowl, combine the oats, coconut, pumpkin seeds (I crushed mine a bit in the food processor first, but you can leave them whole if you like), protein powder, and banana chips.
2. In a food processor, blend together the avocado flesh, coconut oil, sweeteners, spirulina, salt, and lime zest and juice. Pour the liquid over the oat mixture and stir to evenly coat. At this point you can just stash it in the fridge and eat as is.  If you want it crunchy, spread the granola out onto a large rimmed baking sheet and bake for 15 mins, stir, and then bake for 10-15 minutes longer, until starting to brown up.  Let cool.
3. To make the bars, preheat the oven to 350, oil a 9 inch square baking pan, and place 2 1/2 cups of the granola in it.  In your food processor, blend the hemp seeds, kiwis, lime juice and zest, and agave nectar until totally smooth. Pour the hemp-kiwi mixture over the granola in the pan and stir to evenly coat. Press the mixture down with the back of your spoon. Bake for 20 minutes in the preheated oven. Let the bars cool completely before you cut them.

This recipe is posted on Slightly Indulgent Tuesdays , Allergy-Friendly Lunchbox Love, Whole Foods Wednesdays, Wellness Weekend and Allergy-Friendly Fridays.


Monday, April 16, 2012

Three-Ingredient Homemade Applesauce Fruit Snacks

 My kids love Annie's bunny fruit snacks. At around $4 a box, we normally ration them out as special treats.  And, admittedly, I use them for bribery in moments of desperation.  I said to Anthony the other day, "That would be so handy if I could make my own fruit snacks." To which he immediately replied that there is no way homemade fruit snacks would ever taste the same as Annie's.  Of course he is right; I don't have tapioca syrup and tapioca syrup solids laying around my house, so I am not very hopeful of replicating the bunnies.  However, this afternoon I did make a healthy fruit-snack- type treat that is tasty in its own right, while not being so much like candy like store-bought fruit snacks.  I only had leaf-shaped candy molds that my mom gave me a while back, but I'm sure there are cuter molds to be found at the craft stores these days. Or you can just dice the snacks really small and make fruit snack bits.  Next time I will experiment with other fruits, but for now I hope you will enjoy these easy treats.


1 cup unsweetened applesauce
2 Tbsp. brown rice syrup, agave nectar, or maple syrup (or more, to taste--depending on how sweet your applesauce is.)
2 tsp. agar powder

1. Mix all of the ingredients together in a small non-stick saucepan. Bring to a simmer over medium heat, and then turn down the heat to low.  Simmer for 20-30 minutes, until the liquid in the applesauce has evaporated and the mixture is reduced by about one half.  Be sure to stir periodically so that the applesauce doesn't burn to the bottom of the pan.
2. Lightly oil your candy molds or a shallow pan and spoon in the applesauce mixture. Chill for 30 mins. to an hour, until totally set. At this point, if you just poured the mixture into a shallow pan, you can dice it into little finger-sized bits. Store the fruit snacks in a covered container in the fridge.

This recipe is posted on Slightly Indulgent Tuesdays, Allergy-Free Wednesdays, Allergy-Friendly Lunchbox Love, Melt in Your Mouth Mondays ,Whole Foods Wednesdays, Healthy 2Day Wednesdays and Wellness Weekend.

A few weeks ago I dared to take the kids to Disneyland by myself. Let us never speak of it again. Here they are on the Mark Twain riverboat. They had a great time; I thought I would lose my mind if I had to tell them one more time not to lick anything on the boat. Really, should that even be necessary?


Thursday, April 12, 2012

So-Creamy Cauliflower Pasta Crisp

There are many recipes out there for vegan mac and cheese. This is not one of them. Here is just a creamy pasta dish that doesn't pretend to be cheesy, but just revels in being delicious. Sawyer enjoys this in blissful ignorance of the fact that cauliflower is the main ingredient. While I believe that kids should enjoy vegetables in their "unhidden" state, Sawyer just doesn't, and I have stopped fighting it.  He will eat them in sauces, finely diced in rice dishes, in any number of veggie burger variations, in soup, but just eating them straight is such a chore that I only require him to gag through a bite or two of plain carrot, broccoli, etc. and then call it good.  A few weeks ago I bought those dried green beans from Trader Joe's for Abiline, and she was chowing down with such gusto in the car that Sawyer ventured to ask for one.  He cautiously chewed it, and then, in breathless disbelief, declared, "I just ate a green bean!"


1 red pepper, roasted and blackened skin removed
1 head of cauliflower, cut into bite-size florets
1 lrg. yellow onion, thinly sliced
1/4 c. olive oil
1/2 tsp. salt
1/4 tsp. pepper, or to taste

1 1/2 cups cooked garbanzo beans (or 1 can)
1/4 c. tahini
1/3 c. full-fat coconut milk
1 c. plain non-dairy milk
3 Tbsp. chickpea miso (or mellow white miso, if no soy-allergy)
2 Tbsp. balsamic vinegar
salt and pepper to taste

3/4 lb. pasta

1 1/2 c. favorite cracker crumbs
1 Tbsp. olive oil

1. Preheat oven to 425. Toss cauliflower and onion with olive oil, salt, and pepper. Roast cauliflower and onions for 30 mins., on a large baking pan, stirring halfway through. Turn oven down to 375 when you take the veggies out.
2. While the veggies are roasting, bring a large pot of water to boil and cook pasta according to package directions. Drain and set aside.
3. Place roasted cauliflower and onions in a blender with red pepper, chickpeas, tahini, coconut milk,  non-dairy milk, vinegar, and miso and blend until smooth. Taste and add additional salt and pepper as desired.
4. Grease a 9x12 or 11x15 baking disg and add pasta and sauce and stir to combine. In a food processor, pulse crackers into fine crumbs and then add olive oil and pulse to combine. Sprinkle crumbs on top of pasta and bake covered with foil for 15 mins, then uncover and bake for 10 minutes more. 
 
  
I know Easter is over, but we still love our bunny ears. This is about the only Easter thrill my kids get beyond a piece of allergy-free chocolate bar that we indulged in on Easter morning, since allergy-friendly candy is expensive and scarce.  I am fine with that, though, as it allows us to better focus on Christ and the importance of the resurrection instead of on Easter baskets.

This recipe is posted on Wellness WeekendMeatless Mondays and Allergy-Free Wednesdays.

Monday, April 9, 2012

Raw Frozen Coconut Truffle "Dove Bars"

When I was around eight years old, my oldest sister was in high school and had a regular job babysitting for a family that lived across the street from my elementary school. She would pick me up from school some days and take me over to play with the little boy and girl she was watching.  I loved going over to their house because they had so many convenience foods that we never had in our home. Why was I so twisted that I thought that TV dinners were a delicacy?  I guess they were just novel to me because I was fortunate to have a mother who cooked dinner every night--which I certainly did not appreciate at the time.  Other than frozen entrees, I loved to raid the miniature Dove ice cream bars this family always had on hand.  When I took a bite of these raw frozen treats that I concocted last week, I was immediately taken back to my memories of those Dove bars.  Of course, these raw frozen truffles have a personality of their own--but they are as rich and delicious as the ice cream treats of my youth.


For the creamy filling:
1 1/2 cups raw, shredded coconut
3 Tbsp. cocoa butter
1/4 cup xylitol or coconut sugar (I used xylitol to get the white color of the filling, but if you have objections to that, I'm sure coconut sugar would work!)
1 tsp. vanilla extract
1 Tbsp. coconut milk

For the chocolate coating:
3/4 cup raw, shredded coconut
1/4 cup cocoa powder
1/4 c. raw, shelled pumpkin seeds
2 Tbsp. cocoa butter
2 Tbsp. agave nectar, coconut sugar, or xylitol
2-3 Tbsp. coconut milk, or more, if needed to reach a smooth, pliable consistency 


1. Line a baking sheet with parchment paper.  In a food processor, puree the all of the creamy filling ingredients until a smooth dough forms that can hold together well. Shape the filling into about a dozen evenly-sized rectangle or egg shapes. Place them on the prepared baking tray and freeze for 10-15 minutes while you make the coating.
2. To make the chocolate coating, clean out your food processor work bowl and add the chocolate coating ingredients, starting with 2 Tbsp coconut milk.  Puree until the coconut and seeds are all ground up; add more coconut milk, as necessary, until you have a smooth, spreadable consistency that you can mold around the filling. 
3. Remove the tray from the freezer and roll each piece of frozen coconut cream in the chocolate coating. This is a bit messy; you will need to use your fingers a bit to mold the chocolate all the way around the filling. Place the finished truffle bars back on the tray and freeze for a half an hour to firm up the coating before you eat them.

Hooray for Slightly Indulgent Tuesdays , Allergy-Free Wednesdays, Wellness Weekend and Made from Scratch Mondays!

I almost passed out from shock when I walked in and saw this loving embrace. I made them hug again so that I could record it for posterity, but this outburst of affection was Sawyer's idea, not mine.  Abiline was so thrilled; she just loves her Ya-ya. 


Tuesday, April 3, 2012

Agave-Sweetened Strawberry Lime Cake with Avocado-Lime Filling and Coconut Butter Frosting (Wheat-Free)


Happy 
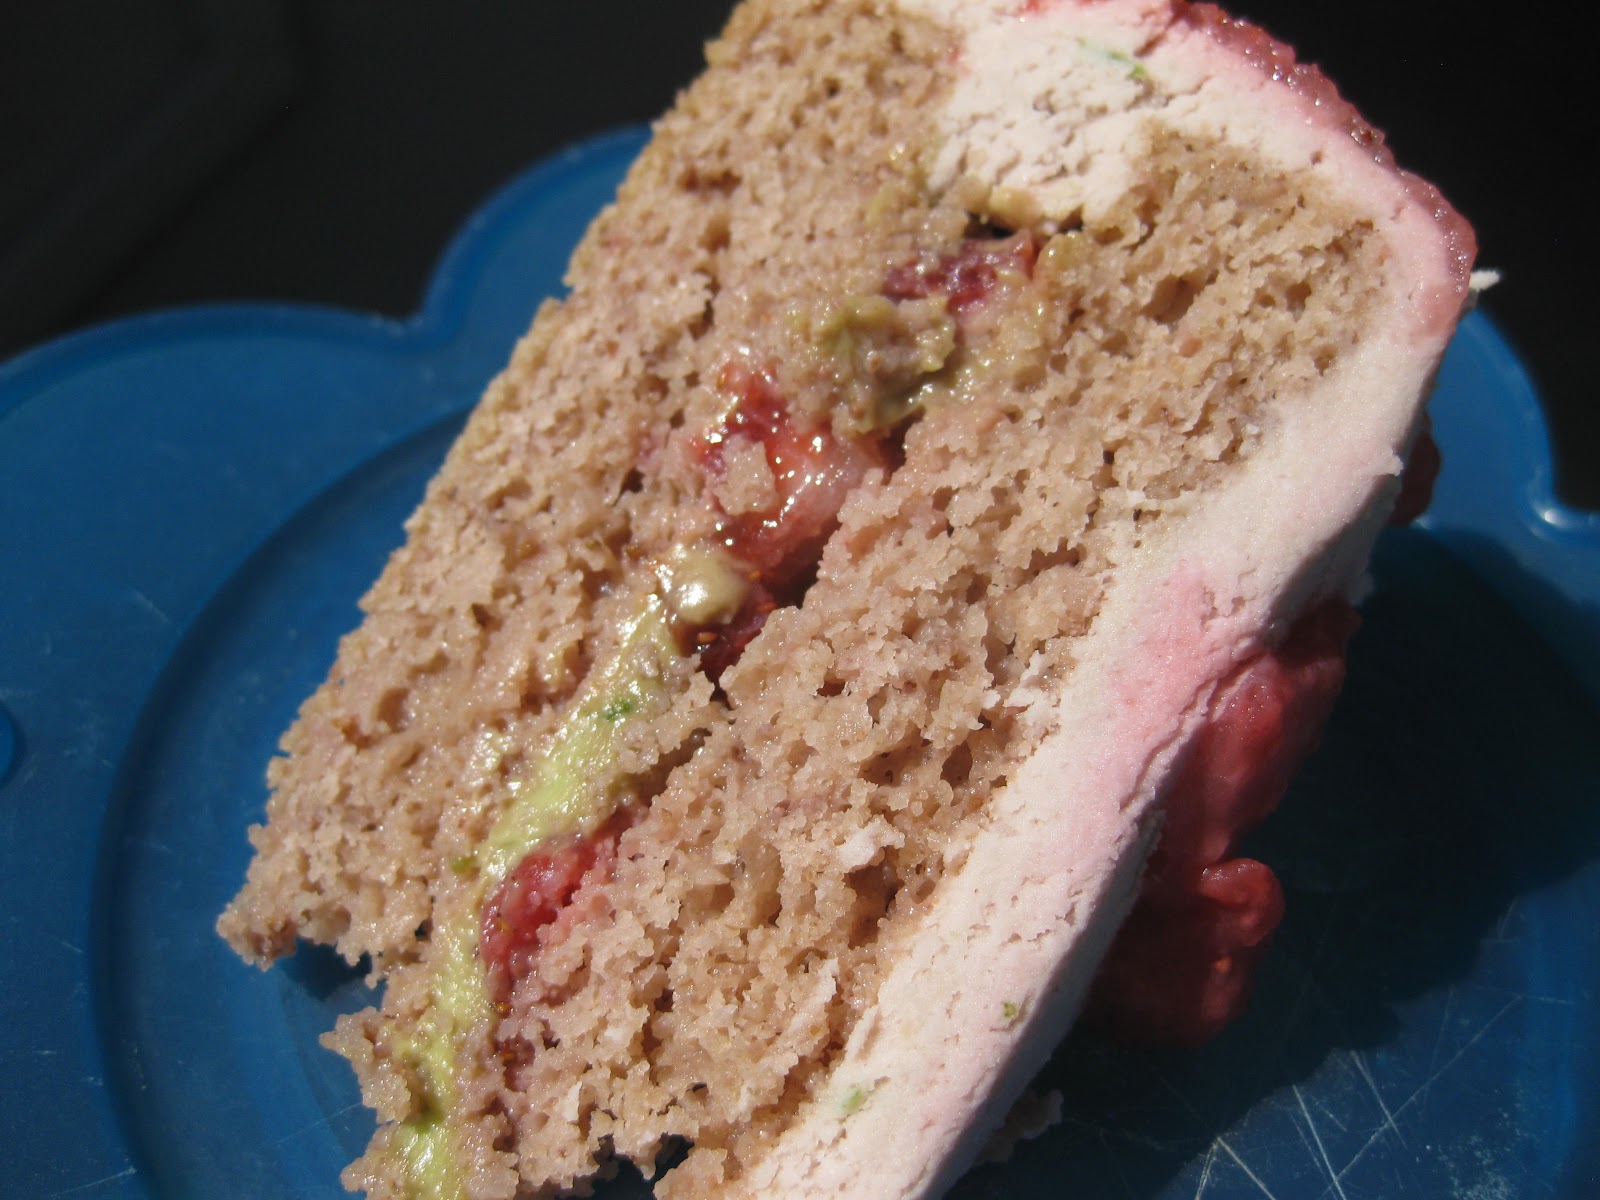
Easter weekend! Last Thursday was Anthony's birthday; to celebrate, he requested a strawberry cake. While I was musing over how to make it, Sawyer suggested we should make a lime cake instead. So I did both. And while I was experimenting, I went ahead and made it wheat-free and agave-sweetened as well. I am usually not much of a cake person myself because I find it to be too sweet most of the time, but this cake was so moist, with just the right amount of sweetness, that we were all gobbling it down. This doesn't make a very tall layer cake; it's more family-size. If you want to make a tall cake for a bigger party, double the recipe.

For the strawberry-lime cake:
2 cups barley flour
1/2 tsp. sea salt
1/2 tsp. baking soda
3 tsp. baking powder
2 1/2 cups sliced strawberries
2/3 cup agave nectar
1/2 cup non-dairy milk
3 Tbsp. canola oil
1/4 cup lime juice (about 2 limes worth)
zest of 2 limes (optional, if you want to up the lime flavor)
1 tsp. vanilla extract

For the avocado-lime filling:
1 large, very ripe avocado
Juice and zest of 1 lime
2 Tbs. tapioca starch
1-2 Tbsp. agave, to taste
2/3 cup sliced strawberries

For the strawberry-lime coconut butter frosting:
2 cups dried, shredded coconut
1 Tbsp. coconut oil
1/3 cup all-fruit strawberry preserves
1/3 cup agave nectar
1/4 cup tapioca starch
1/4 cup lime juice (about 2 limes worth)
zest of 2 limes

1. Preheat the oven to 350 and oil two 9 inch round cake pans. In a large mixing bowl, sift together the flour, salt, baking soda, and baking powder.  In a blender or food processor, puree the strawberries, agave, non-dairy milk, canola oil, lime juice, lime zest, and vanilla. Pour the wet ingredients into the dry and stir them together just until evenly moistened and combined.
2. Pour the batter evenly into your prepared pans. Place one pan on the top oven rack and the other on the bottom, on opposite sides from each other. Bake for 12 minutes, and then switch their positions, so that the one on the top left is now on the bottom right and vice versa. Bake for another 12 minutes. A toothpick inserted in the center should come out clean. Cool the cakes on wire racks for about an hour and then place them in the freezer for another few hours for ease in frosting.
3. Prepare the filling by placing the avocado, lime juice and zest, tapioca starch and 1 Tbsp. agave in your food processor and pureeing until smooth. Taste and add additional agave if desired. Pour the filling into a separate bowl and place it in the fridge while you make the frosting.
4. To make the frosting, clean out the food processor bowl, and add the coconut and coconut oil. Blend for 7-10 minutes, until it has become completely smooth coconut butter.  Then add the strawberry preserves, agave, tapioca starch, lime juice and zest. Buzz until smooth. It may not seem thick enough. Just place it in the freezer for about 10 minutes, and it will become perfect spreading consistency. 
5. To assemble the cake, prep a large plate by spreading a thin circle of frosting in the middle, to hold down the cake. Take the cake rounds out of the freezer and use a butter knife or fork to gently dislodge the cakes from the sides of the pans. Gently remove one round and place it on top of the frosting on your cake plate. Get the avocado-lime filling out of the fridge and spread it evenly over the bottom layer. Sprinkle with sliced strawberries, and then place the second layer of the cake on top. Take the frosting out of the freezer and give it a good stir. Spread the frosting evenly over the top and sides of the cake, smoothing as you go, layering it on really well to hold everything together. Top with additional strawberries, if desired, and store it in the fridge until you're ready to eat. 

I linked this recipe up this week to Slightly Indulgent TuesdaysAllergy-Free Wednesdays, and Wellness Weekend. Thanks to all those wonderful bloggers who host these recipe-share events!


The kids were thrilled with the birthday balloons Anthony brought home from work. Once they stopped floating, the became, errrr, a work of art....

Monday, April 2, 2012

Chocolate French Toast Sandwiches with Coconut-Maple Caramel Sauce

Even good cooks have bad days.  In our home, the chocolate chili I made when Anthony and I first got married still lives on in infamy. (We were so poor back then that we had to eat the whole rotten pot!)  On Saturday, a good friend from high school came to visit, and I wouldn't say that the meal was a major mess-up like the chili, but it was totally unimpressive.  I will blame it on the fact that I had food poisoning the night before--from the one time in months that my husband and I went out on a dinner date.  What I should have made my friend was this french toast that I dreamed up the next morning while Abiline was sleeping on my chest--crushing my chest, that is-- after waking up far too early that morning.  We enjoyed this toast for our General Conference breakfast, but I think it would make a great Easter breakfast, too; in fact, I tried to make the toast into egg and bunny shapes, though you may not be able to tell in the picture. Happy Easter, everyone!


For the batter:
1 cup non-dairy milk  (I used So-Delicious coconut milk.)
1/4 cup cocoa powder
1 tsp. vanilla extract
1/4 tsp. salt
2 Tbsp. maple syrup
1 cup no-soy tofu (if you don't have a soy allergy, of course you could use regular silken tofu.)

For the caramel sauce:
1/2 cup full-fat coconut milk
1/4 cup maple syrup
pinch of salt
1/4 tsp. agar powder
1/2 tsp. vanilla extract

8 slices of whole-grain bread
1/4 cup grain-sweetened chocolate chips, ground or finely chopped

1. Make the caramel sauce by combining the coconut milk, maple syrup, salt, and agar in a small saucepan. Heat over medium heat until bubbling around the edges, and then let simmer for 2 mins. Remove the sauce from the heat and place it in the fridge to cool and thicken a bit. 
2. Preheat a large griddle or frying pan over medium heat (about 325 degrees if you have a pancake griddle) and brush it with oil.  In a food processor or blender, blend together the non-dairy milk, cocoa powder, vanilla, salt, maple syrup, and no-soy tofu.  Pour the batter onto a large shallow plate, and dip the bread into the batter one piece at a time, coating both sides. Fry the battered bread on the griddle for about 4-5 mins. per side, until nice and crispy.
3. Once your toast is done, don't turn off the griddle. Assemble the sandwiches by spreading about 1-2 tablespoons of caramel sauce over 4 slices of the bread, then topping with about a tablespoon of ground chocolate. Top with another toast slice, and then place the sandwiches back on the griddle for just a minute or two to melt the chocolate. Serve hot, drizzled with the remaining caramel sauce.

I linked this recipe up this week to Slightly Indulgent TuesdaysAllergy-Free Wednesdays, and Wellness Weekend. Thanks to all those wonderful bloggers who host these recipe-share events!

Here are Abiline and Sawyer post-chocolate toast breakfast. Who wouldn't be happy?